5 Back to school outfits


Sad news: summer is over. But on the bright side, I always get super excited about new school year—whether it’s seeing my friends again, buying school supplies, or even… being able to see my crush again after two long months of summer 🙃. But what excites me the most is the back to school outfits!

So even though I’m not going back to school this year, I thought it would be cool to show you some back to school outfits that I would’ve loved to wear for Week One. 


5 Back to school outfits


Monday

First Day of School

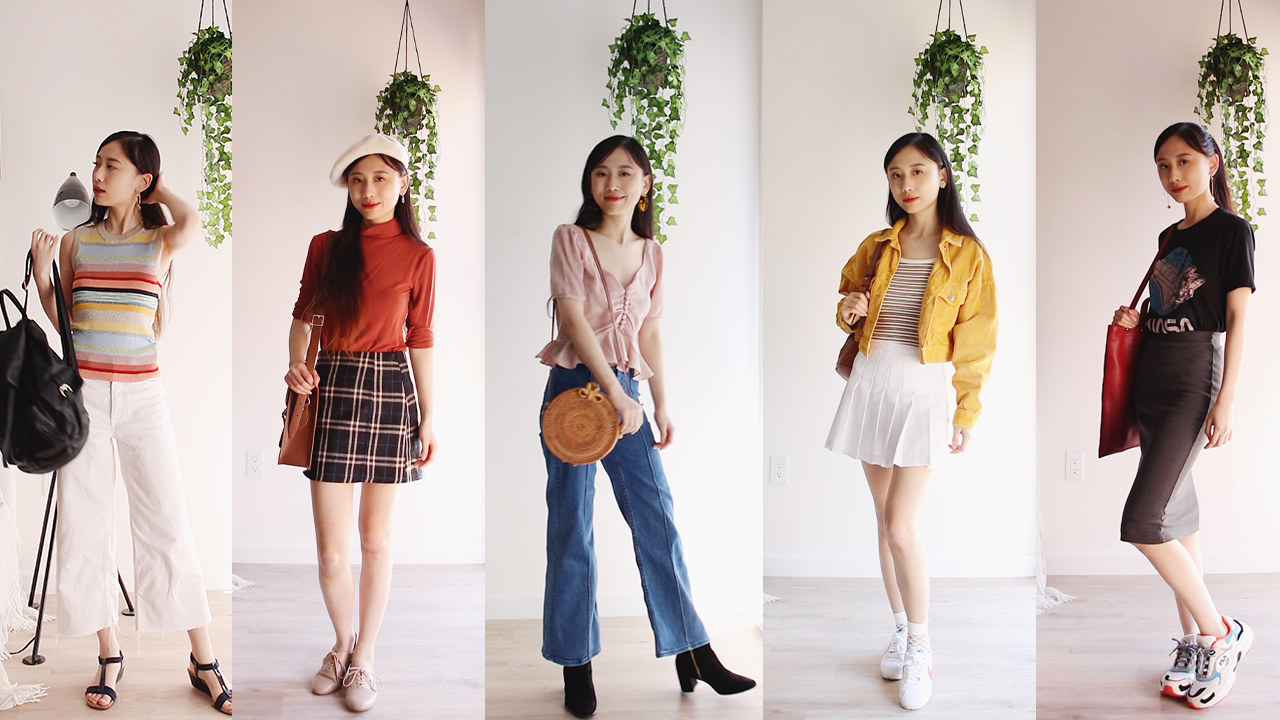
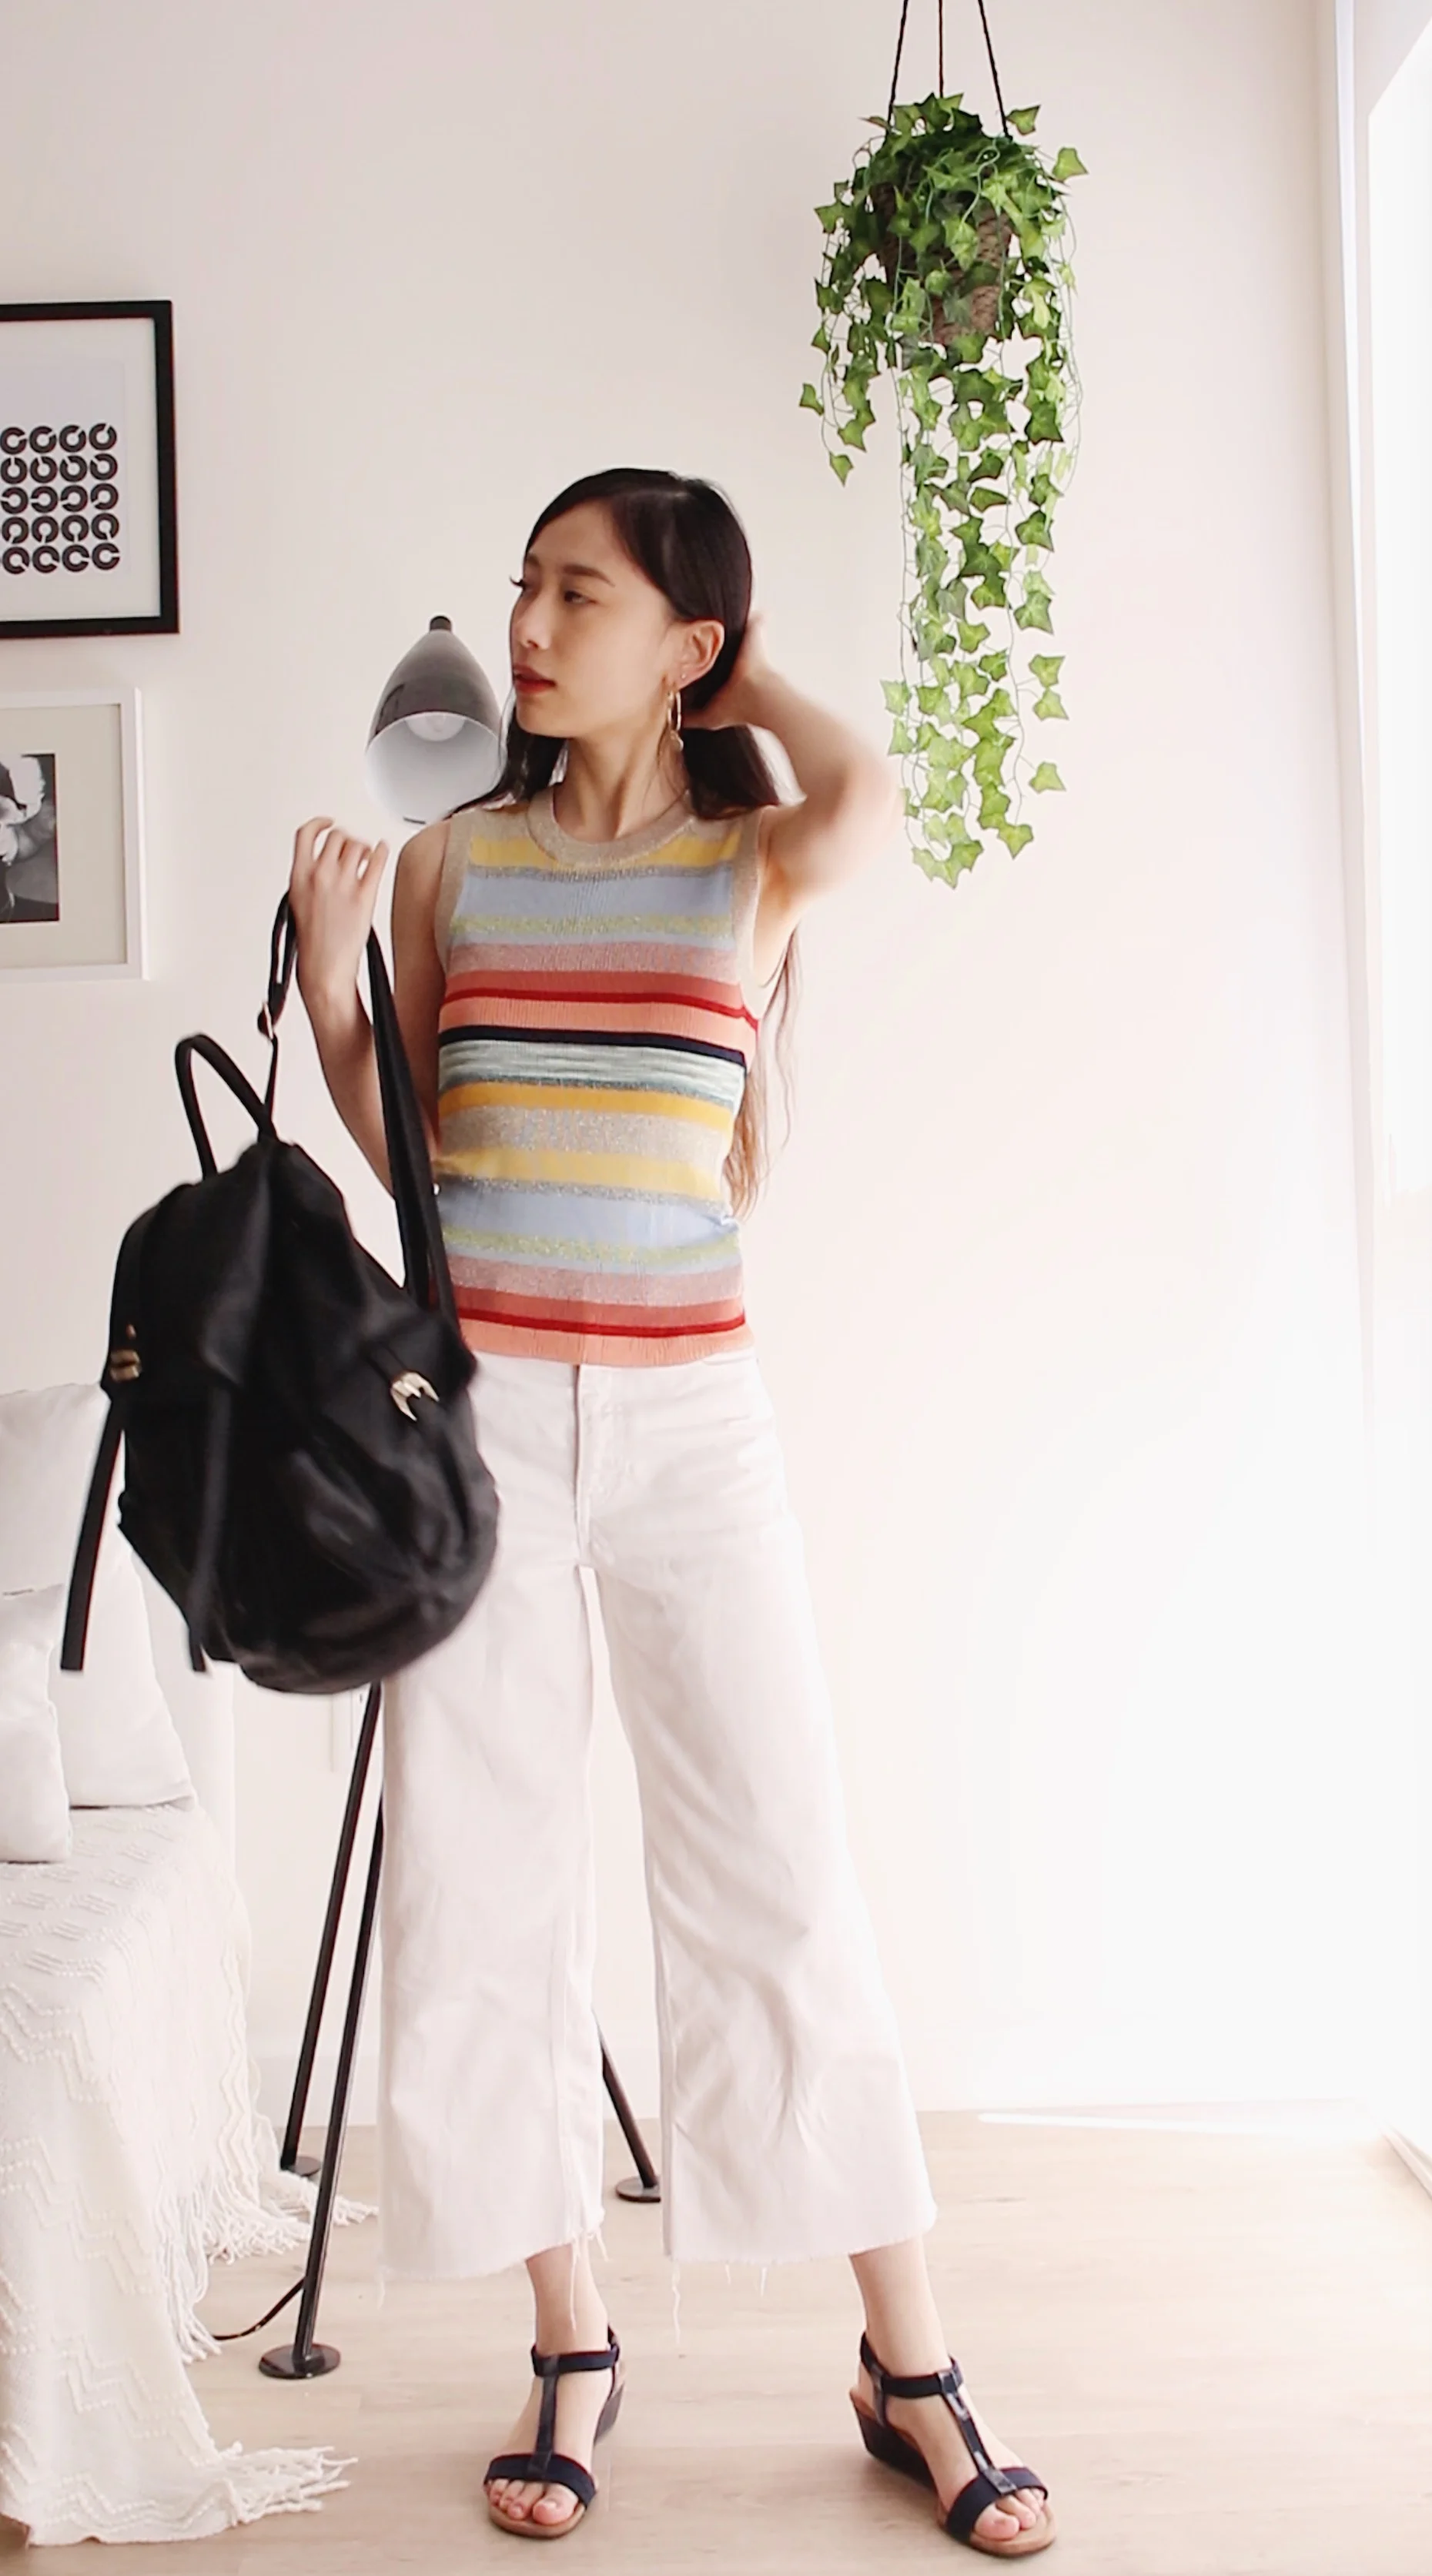
So for Monday, the first day of school, I thought I’d keep it simple with this preppy striped shirt and these white jeans.

Top - Missoni (via Rent the Runway) | White flared jeans - Cheap Monday | Shoes - Alfani | Backpack - Topshop (similar) | Earrings - H&M
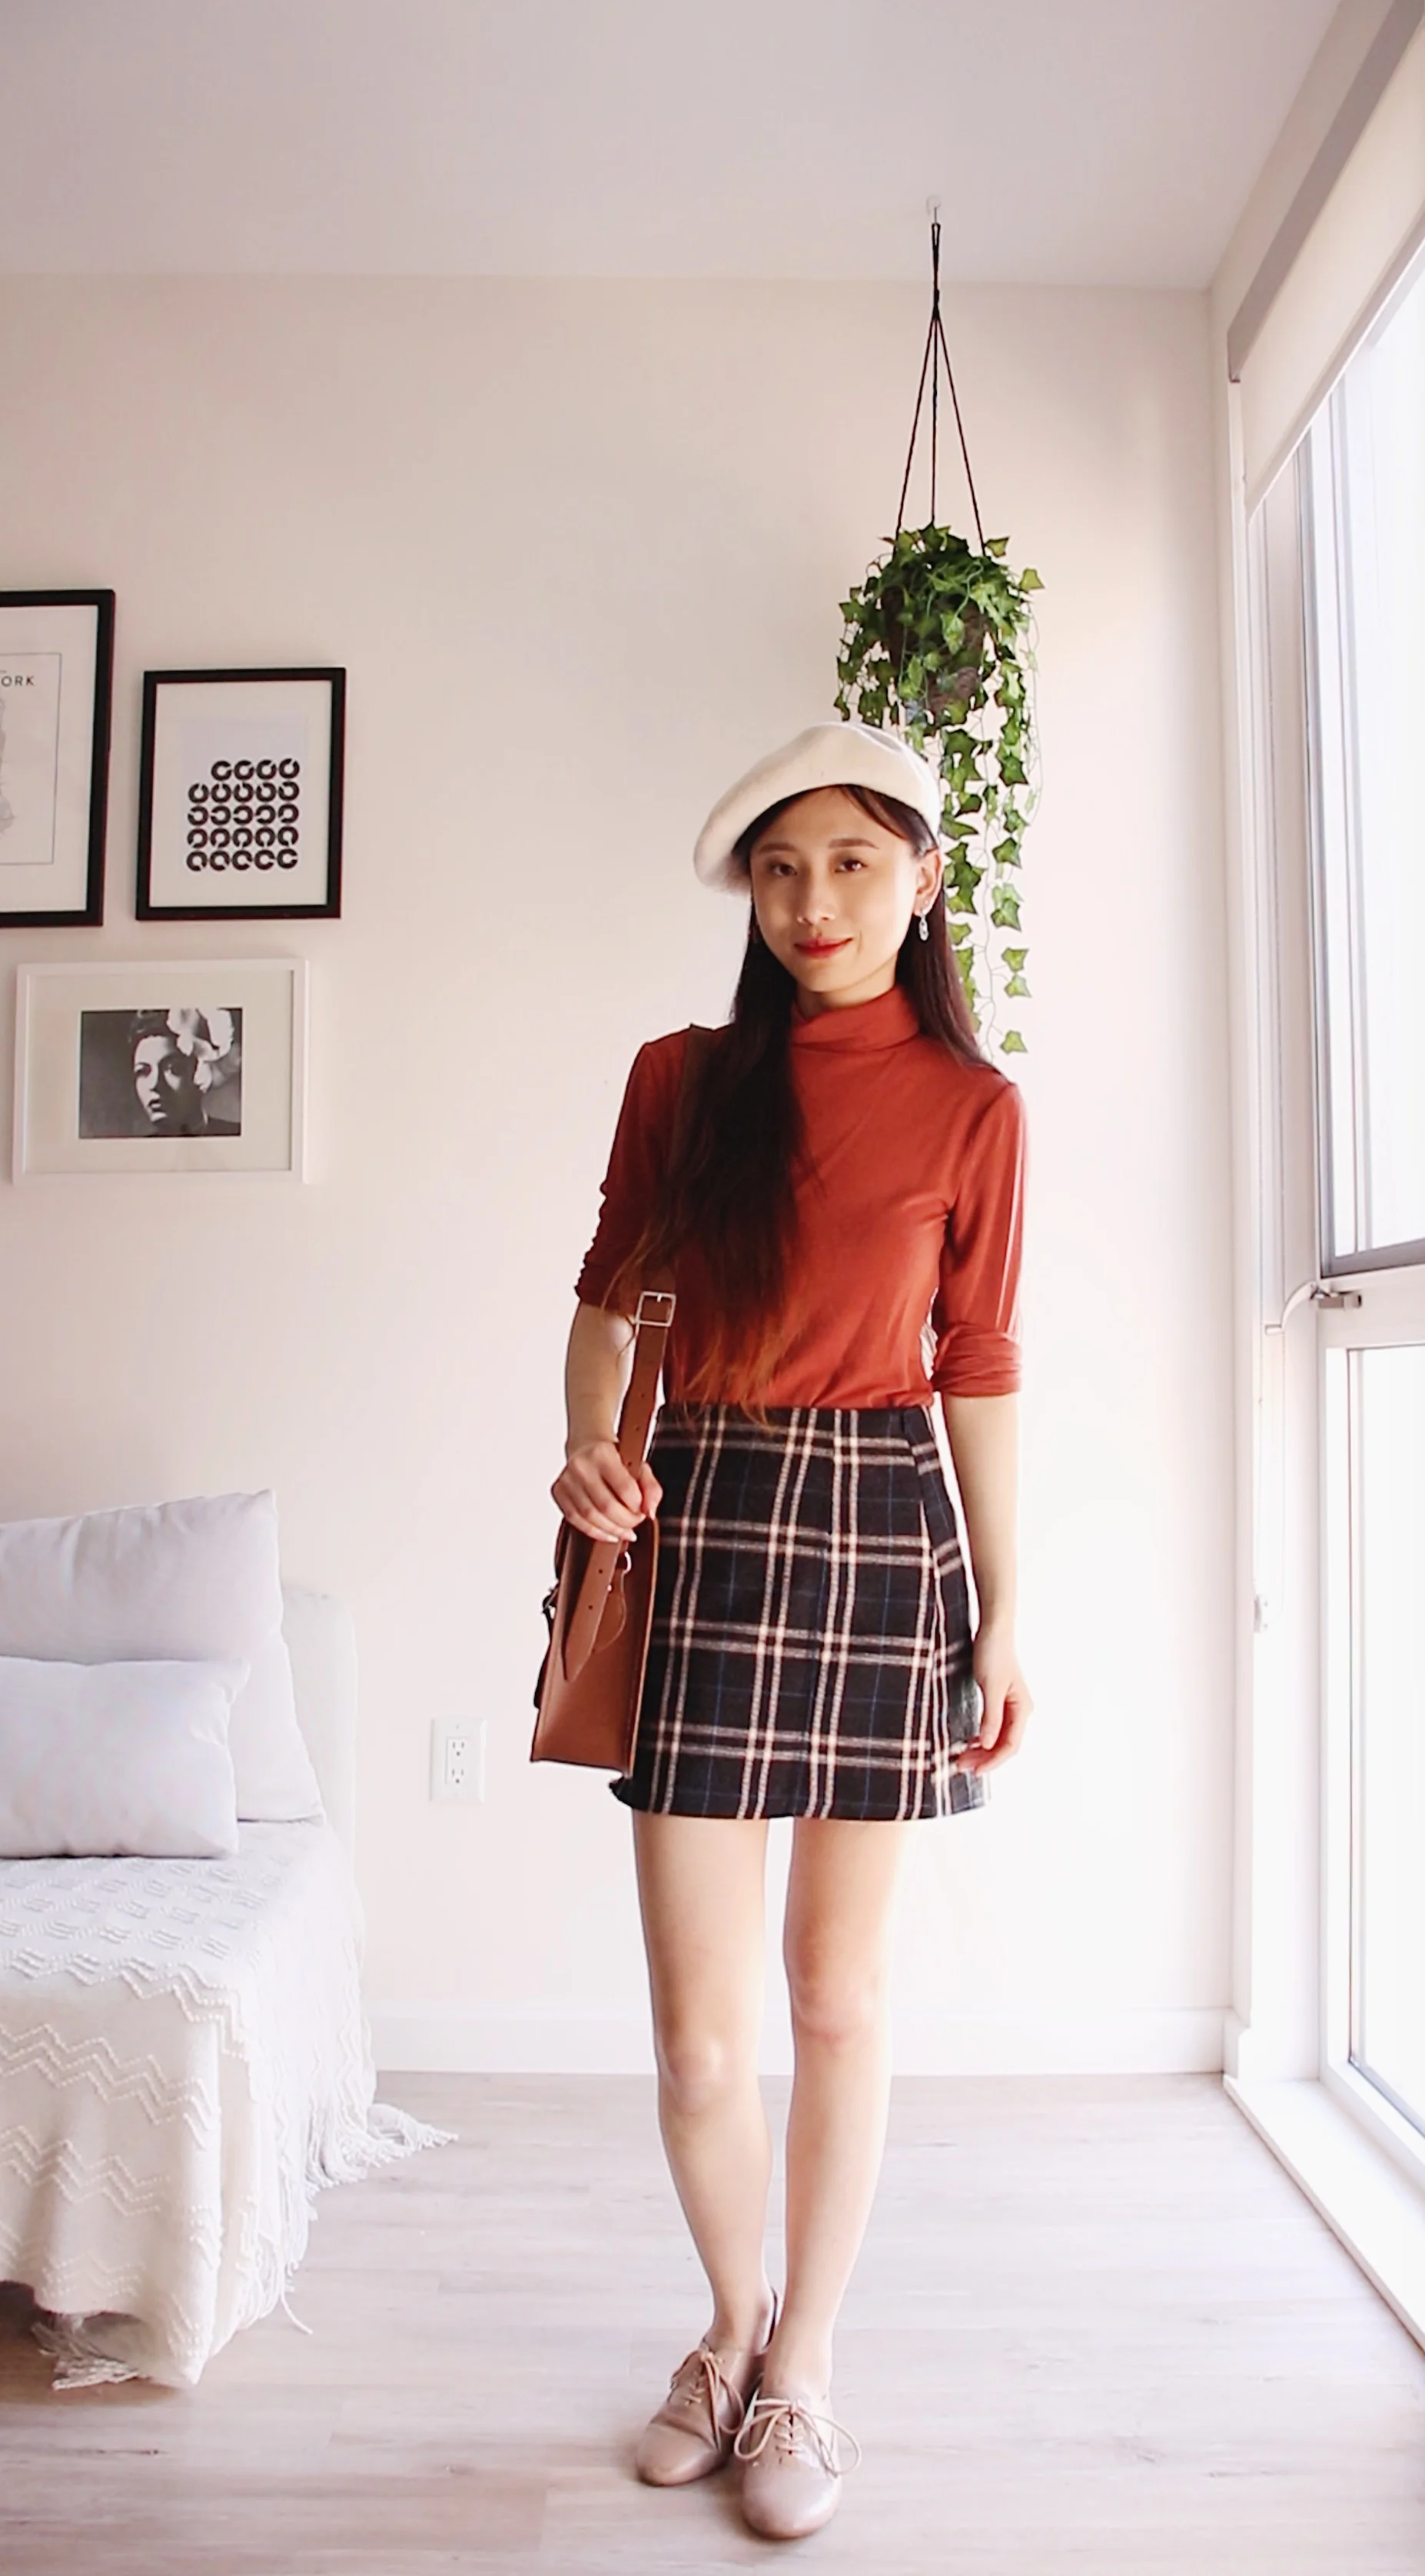
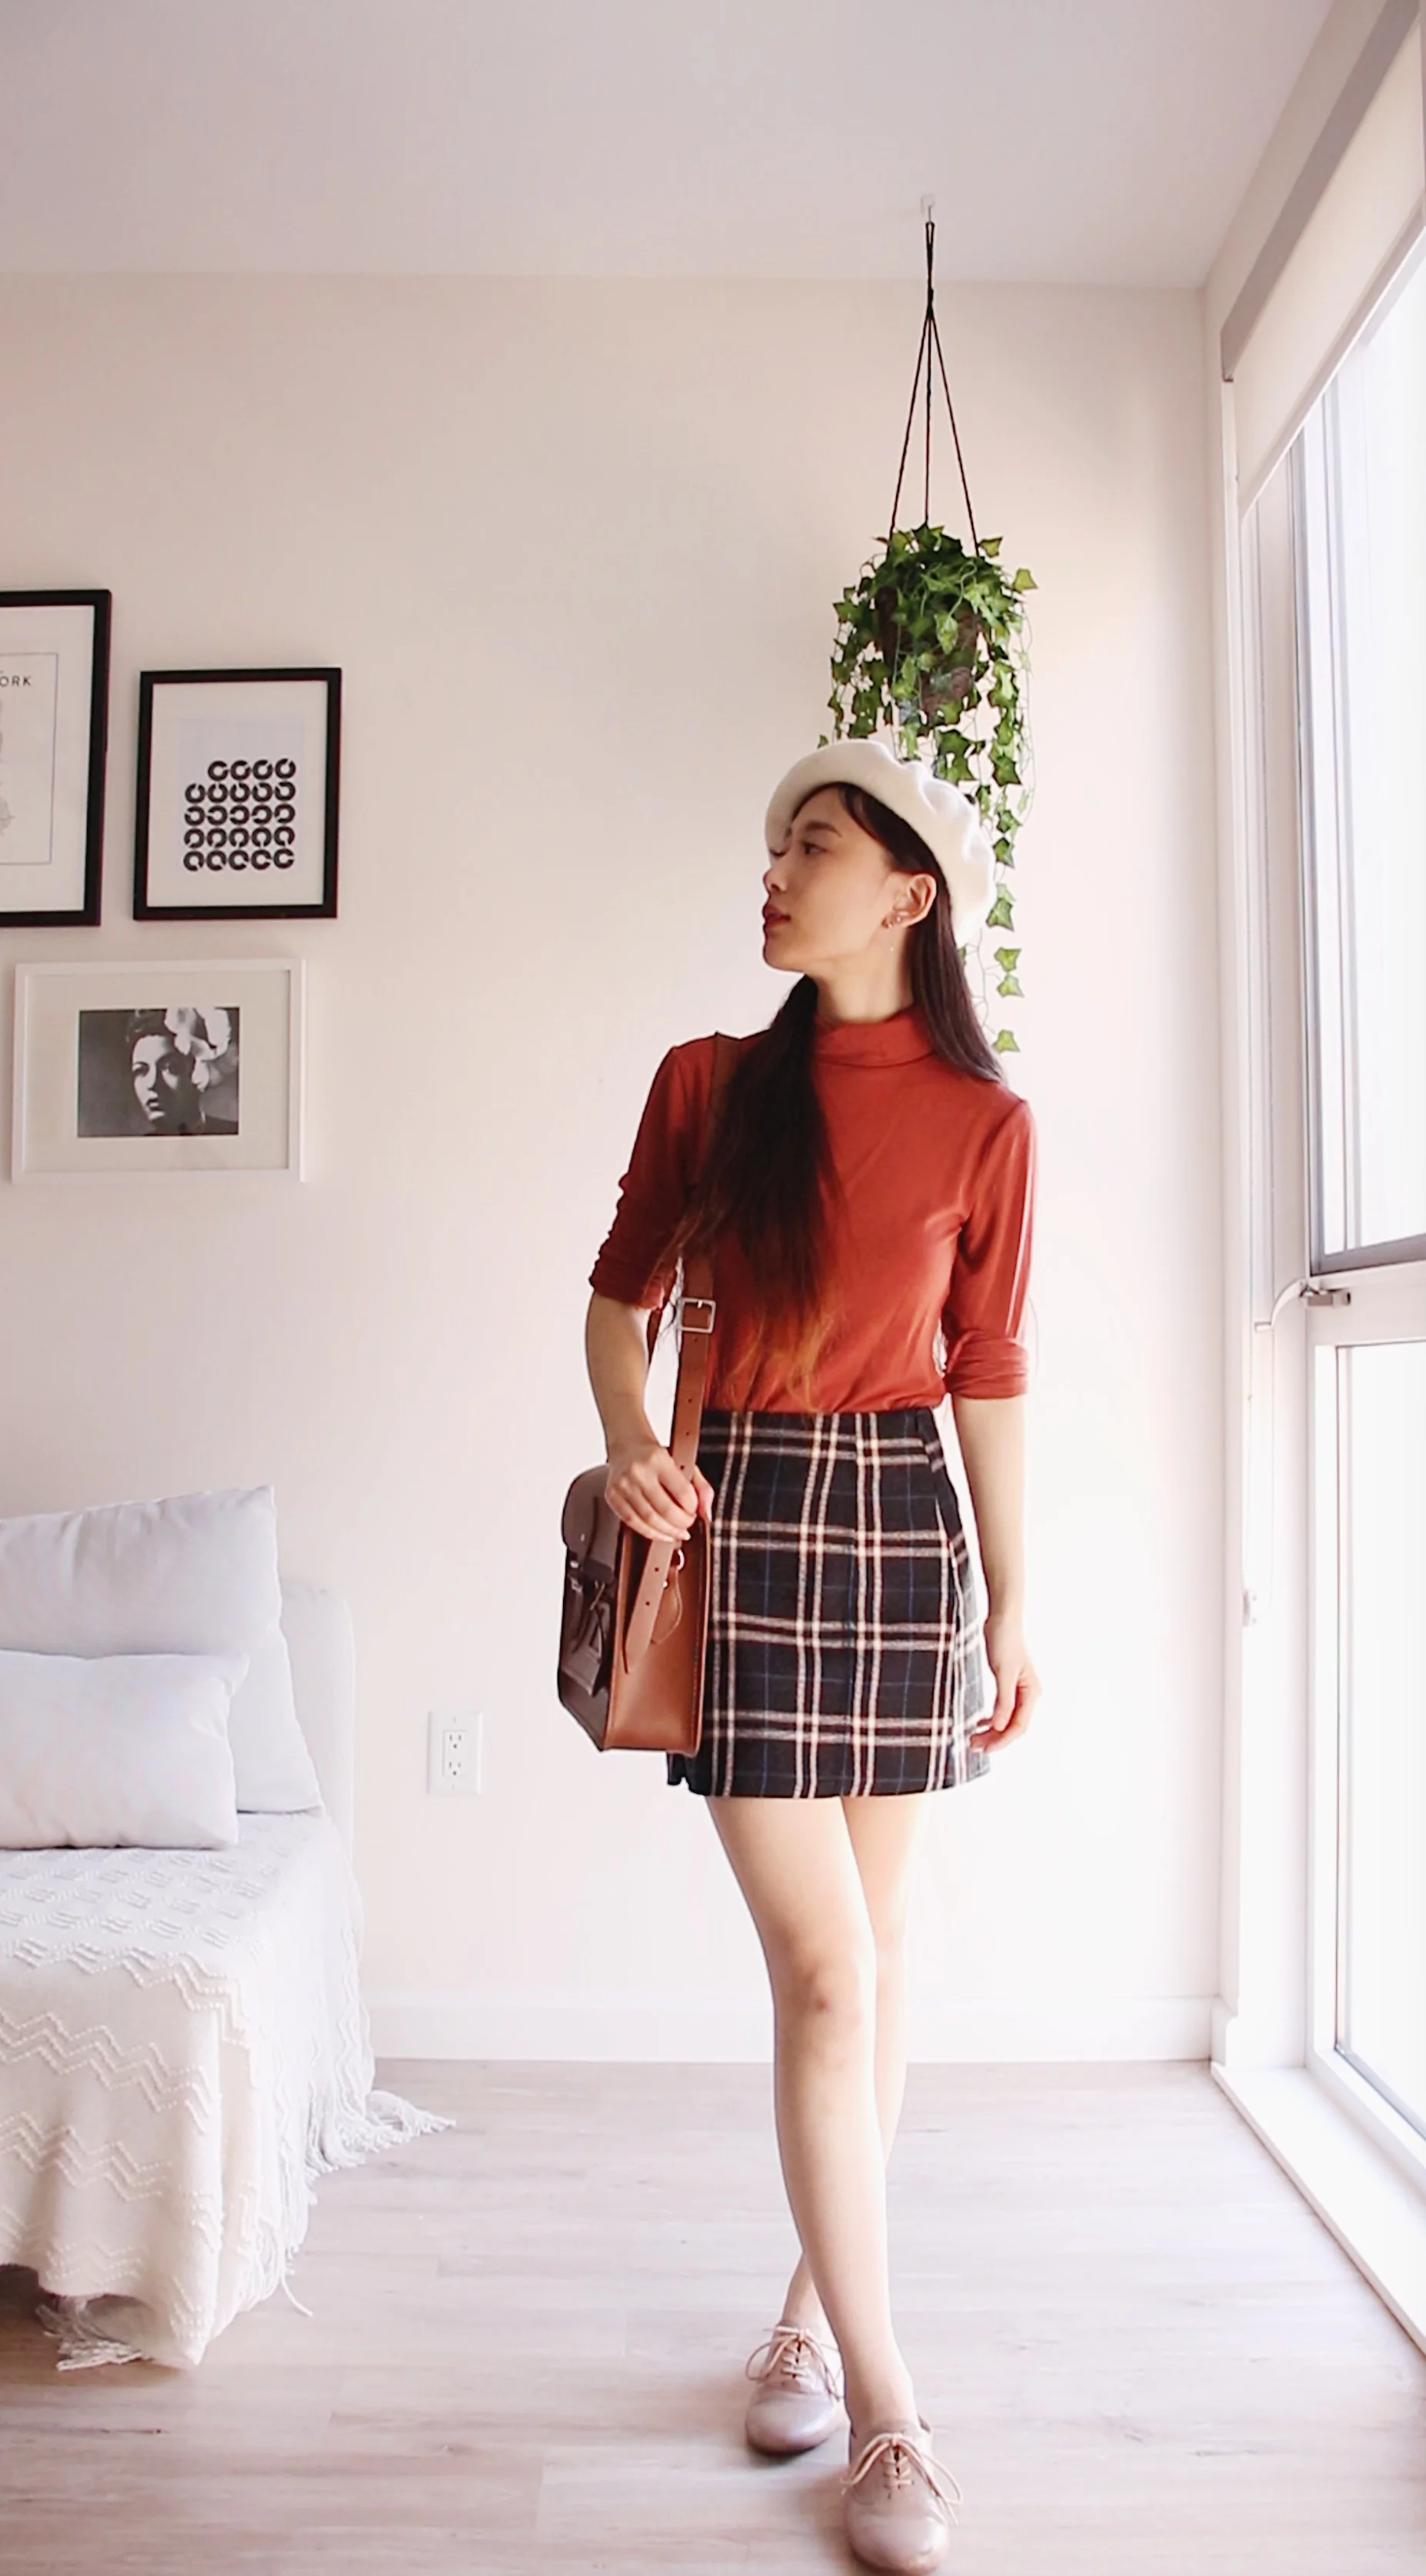
 
 
5 Back to school outfits


Tuesday

The art student

She’s definitely a little more put together and sophisticated than your Monday girl, and probably has a membership at the MoMA and the symphony.

Turtleneck - Yesstyle | Skirt - Chuu | Satchel - Cambridge Satchel Company | Beret - Urban Outfitters | “Picasso” earrings - from a Sydney thrift store (similar) | Oxford Shoes - Modcloth (similar)


5 Back to school outfits


Wednesday

“On Wednesdays we wear pink!”

For this outfit, I went with a Mean Girls meets the 70s meets French girl look

Blouse - Petite Studio (similar)| Flared jeans - 3x1 (via Rent the Runway) | Boots - Calvin Klein | Straw circle bag - Club Monaco (similar) | Turtle hoop earrings - from a Sydney thrift store (similar)
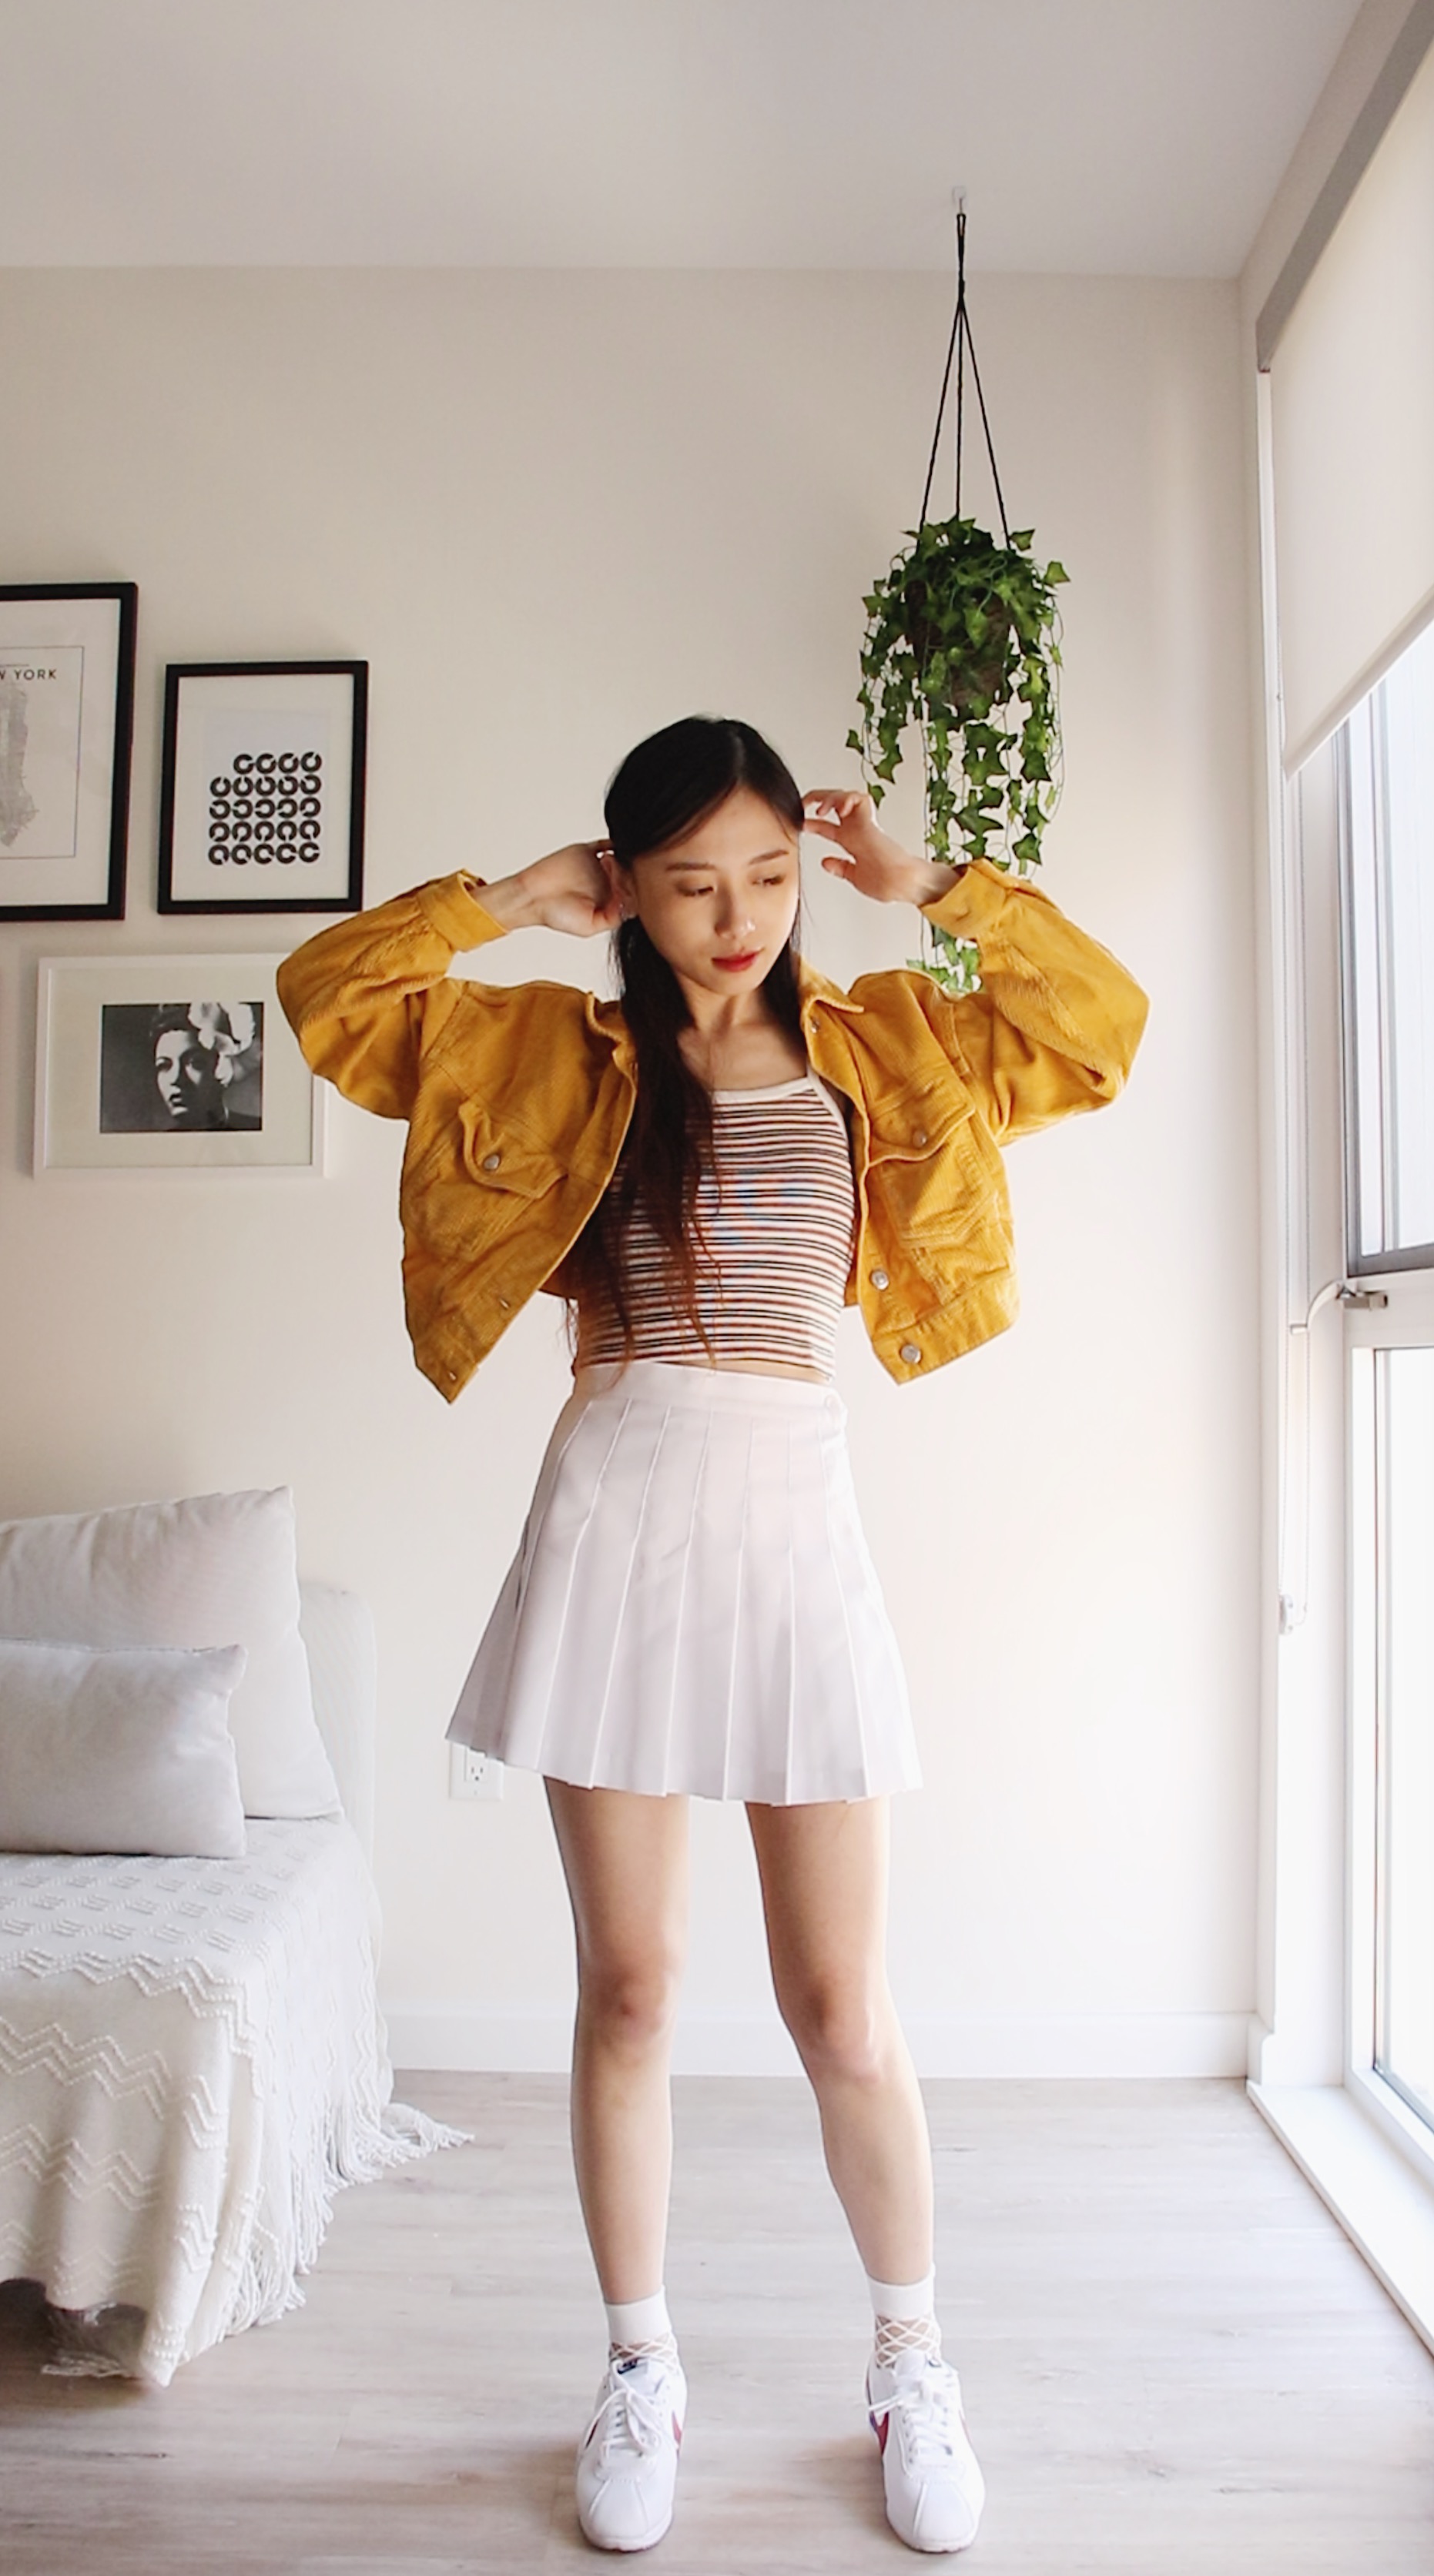
 
 
5 Back to school outfits


Thursday

K-pop (?!!)

Channeling K-pop girl group vibes.

Mustard Corduroy Jacket - Topshop| Striped cropped tank - Brandy Melville | White tennis skirt - American Apparel | Brown leather backpack - Forever 21 (similar) | Cortez Sneakers - Nike | White fishnet socks - ASOS (similar)
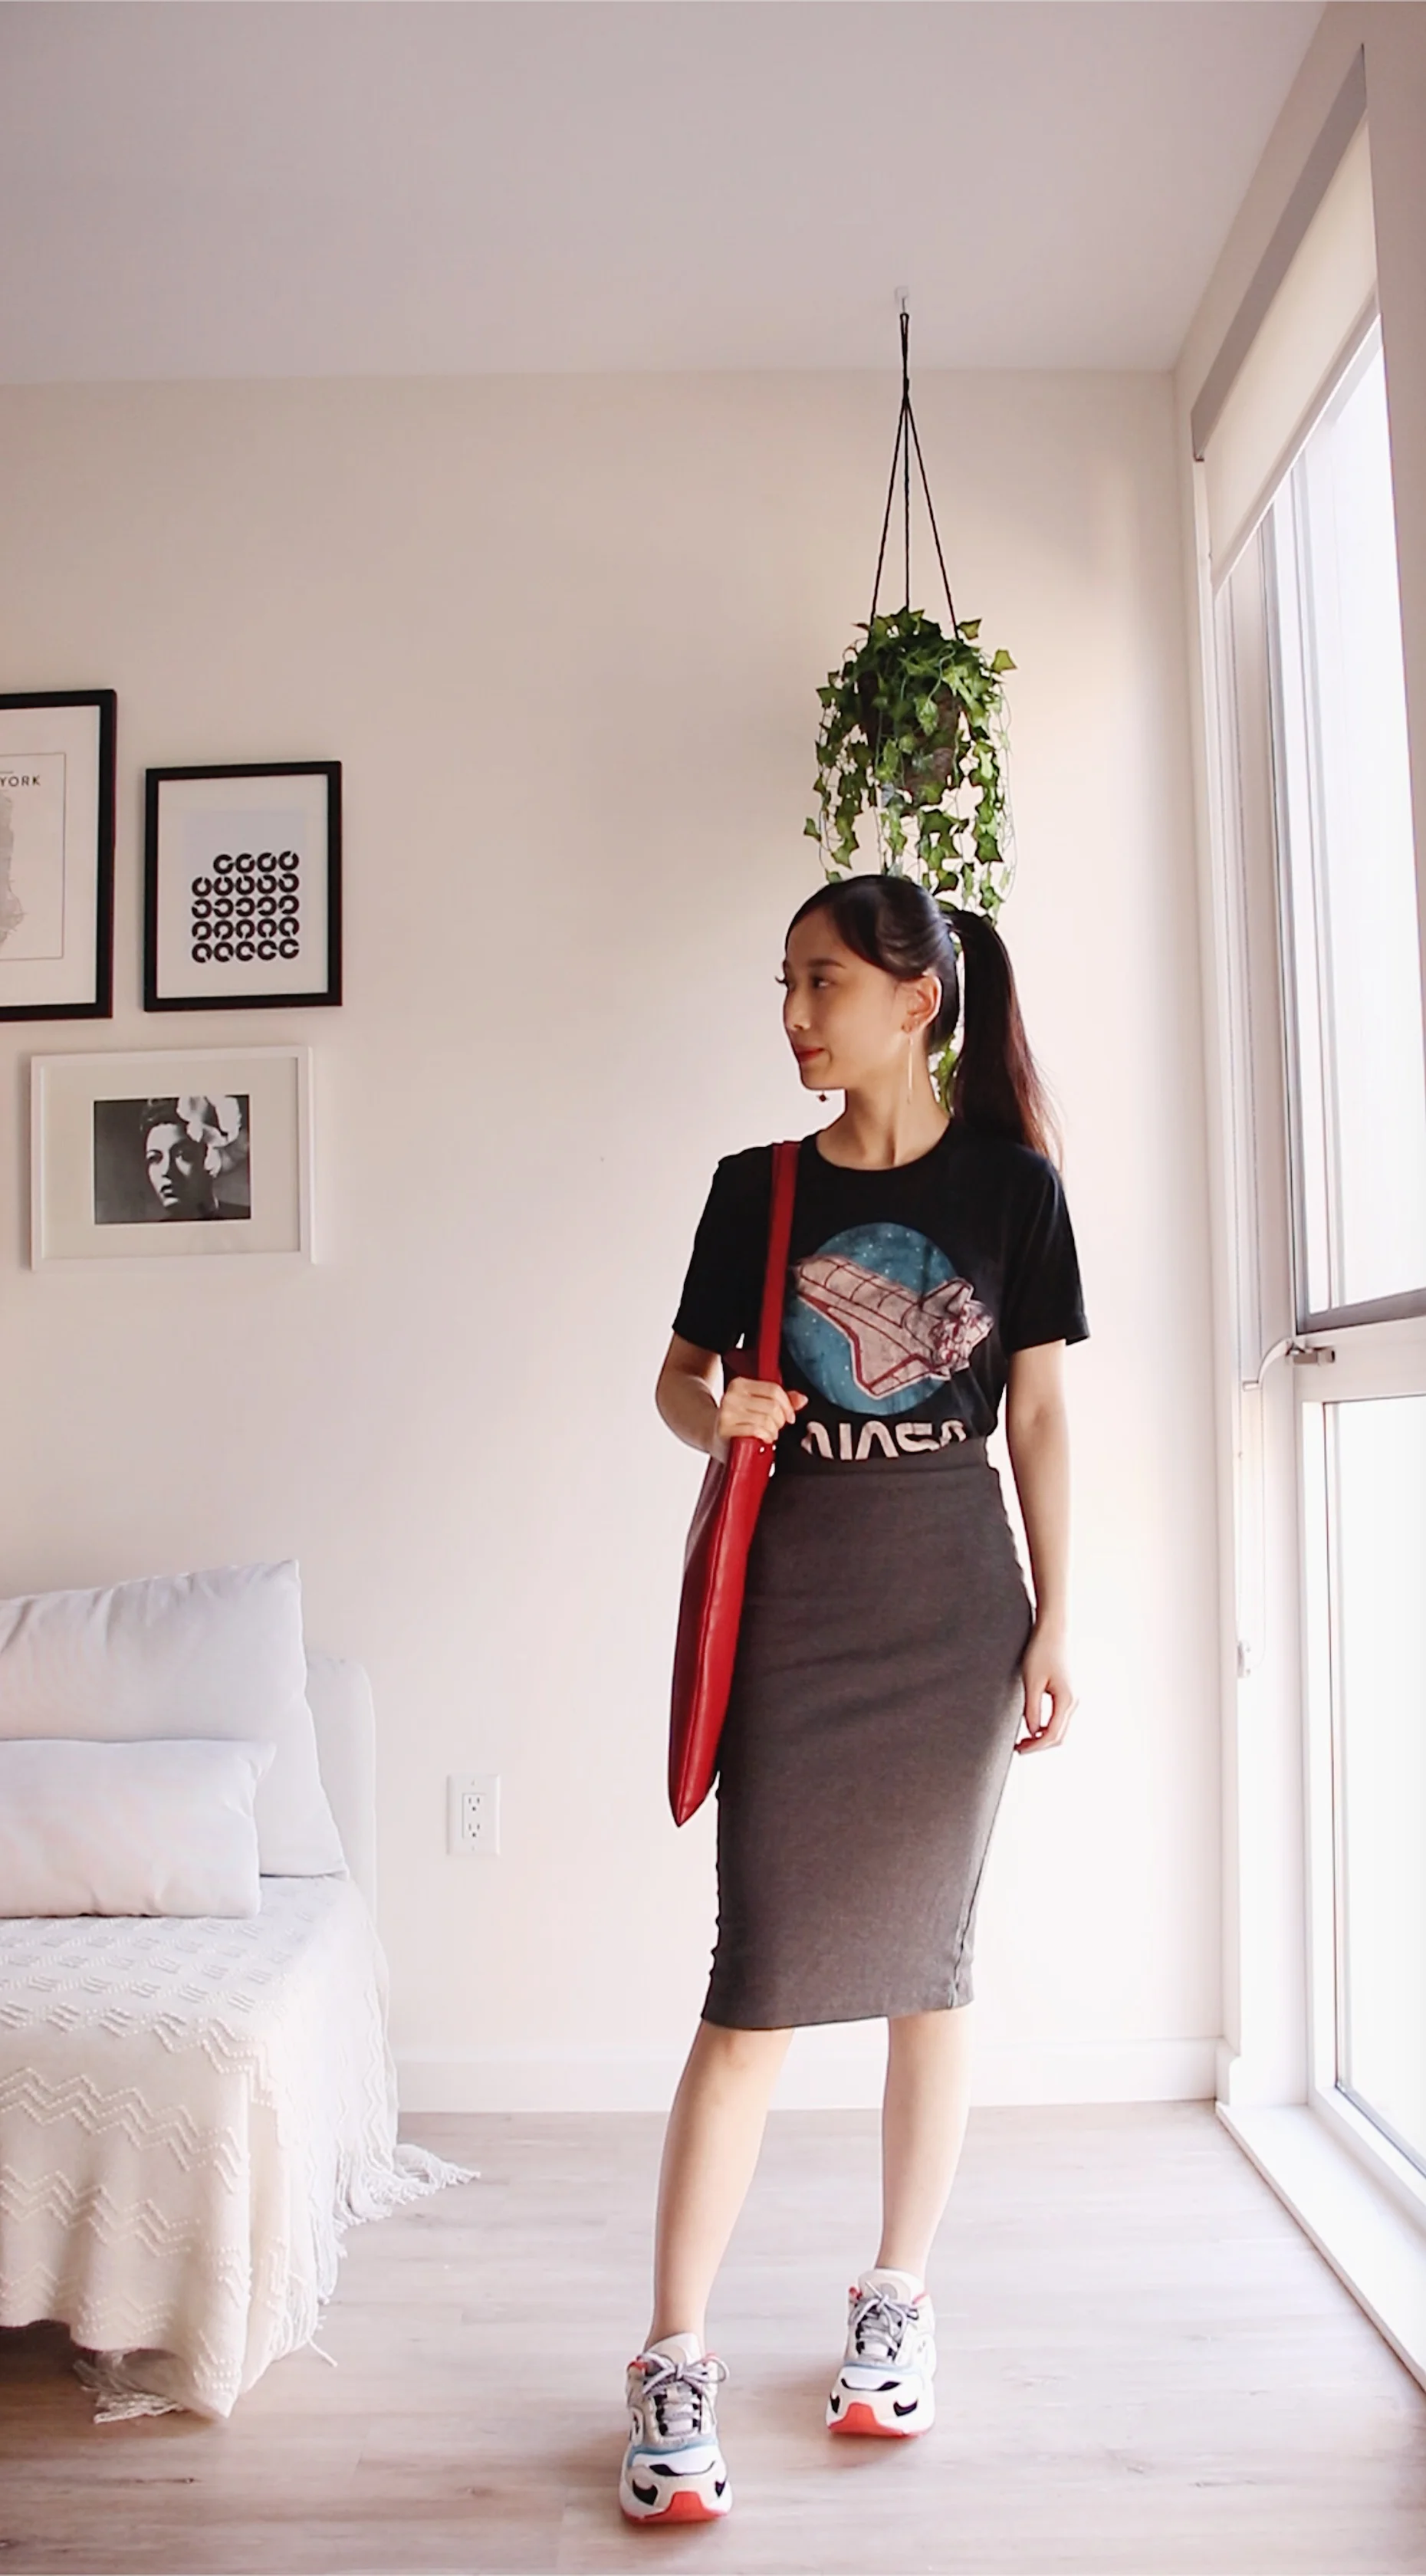
 
 
5 Back to school outfits


Friday

Street style

For the last day of class before the weekend, I wanted to be a bit more adventurous and play with a lot of contrasting elements.

NASA T-shirt - Urban Outfitters (similar)| Body con midi skirt - H&M| “Love you” tote - Rebecca Minkoff | Chunky dad sneakers - FILA | Saturn earrings - made by my aunt (similar)


I hope this video and post gave you some inspiration to create your own outfits for the upcoming semester. Wishing you an amazing 2019-2020 school year!

♥ Cindy

 
Fashion, 2Cindy ZhangComment
Tortilla Española (Spanish Omelette)


Watch the video for a in-depth tutorial on how to make this dish. If you enjoyed watching, please give me a thumbs up/subscribe to me on YouTube!


Tortilla Española (Spanish Omelette)


One dish that I came across literally everywhere in Spain was Tortilla Española, also known as the Spanish omelette. I found it served as a side dish in paella restaurants, in tapas bars with other small eats, and even stuffed into a croissant for breakfast at small cafés. Because this dish is insanely simple, and is traditionally made with only 5 ingredients—eggs, potatoes, onions, olive oil, and salt—I couldn’t wait to come back home and make it in my own kitchen, and now, share with y’all how to make this as well :)


Tortilla Española (Spanish omelette)


This dish can be served cold or hot, as a simple lunch with some salad, or for breakfast in place of your usual omelette. It’s blasphemy to the Spanish to add anything else inside this omelette besides potatoes and onions, but you can definitely get more creative in the comfort of your own kitchen by adding your favorite omelette ingredients—just make sure there aren’t any Spanish people watching you :)

Unfortunately, as you can see from the photo above, the sides of my omelette didn’t turn out to be very smooth and I had some egg jutting out at the edges. If you want to avoid making my mistake, make sure you tuck in the egg mixture on the sides of the pan as you’re cooking.


Tortilla Española (Spanish Omelette)


To make this dish, all you need is 5 simple ingredients: eggs, potatoes, onions, olive oil, and salt. If you don’t have any onions, feel free to leave them out (including onions in your Tortilla Española is a very controversial topic).


You might be shocked at the large amount of olive oil we’ll need to use to initially fry the onions and potatoes. But don’t fret, we’ll drain out the oil from the potatoes and onions and reuse it for frying the omelette later on.


Tortilla Española (Spanish Omelette)


Cooking a Spanish omelette requires a lot of confidence when you’re flipping your pan upside down onto a plate. If you do it fast and definitively, you’ll have no problem flipping the egg out of the pan and won’t make a mess. A lightweight, 8-inch pan will also help in making the flipping easier, as well as making a small enough omelette to work as a side dish.


Tortilla Española (Spanish Omelette)


Tortilla Española is also perfect as a filling inside sandwiches. In Seville, I had breakfast at a café called Salt & Sugar that served the omelette inside a croissant. So at home, I also tried stuffing a slice of the omelette into a toasted croissant with some sliced salami (though traditionally, Spanish people will eat it with sliced chorizo, which I didn’t have).


IMG_3144.jpg


Tortilla Española (Spanish Omelette)

Ingredients (Makes 2 8-inch omelettes)

  • 2 potatoes, peeled
  • 1 medium onion
  • 6 eggs
  • 1/2 cup olive oil
  • 2 tsp salt
  • Chopped chives for garnish (optional)

Takes , Makes 2 eight-inch omelettes.


Instructions

  1. Slice the onion into thin half-moon pieces. Peel the potatoes and also slice them thinly into half-moon pieces, about the same size as the onions.

  2. Heat up ~1/2 cup of olive oil in a skillet, and toss in the onions before the potatoes. Adding the onions first will bring out their sweetness to infuse with the potatoes later.

  3. Add the potatoes and simmer with the onions in the olive oil for about 10 minutes, or until they are slightly crispy and browned.

  4. Crack 6 eggs into a large bowl and whisk them together thoroughly.

  5. Put a strainer on top of a heat-proof bowl and strain the oil away from the onions and potatoes. Set aside the onions and potatoes to cool before adding them to the egg mixture to avoid scrambling the eggs.

  6. After they've cooled down, add the potatoes and onions into the egg mixture and combine with about 2 tsp of salt.
  7.  
  8. Heat some of the leftover strained oil in an 8-inch nonstick skillet, making sure to coat the bottom of the pan entirely. Add half of the egg mixture and stir gently to cook the eggs evenly.

  9. Add a lid on top of the skillet and let the eggs cook for about 2-3 minutes.

  10. Put a plate on top of the skillet and flip the skillet upside down onto the plate, so that the omelette is cooked side up. Make sure to do this away from the stove to prevent accidents.

  11. Add some more oil to the pan and slide the omlette from the plate back into the pan, uncooked side down.

  12. Cook for another 2-3 minutes, and flip the omelette upside down onto a plate once again.

  13. Garnish with chopped chives if you'd like, and serve as a side dish, with a salad, or inside a croissant.


Tortilla Española (Spanish Omelette)


It’s been a while since I posted any food content on the blog or made a cooking video. I hope you enjoyed this recipe and that you try this in your own kitchen! Let me know how it turns out for you by tagging @cinders_zhang on Instagram! Support me by saving this recipe on Pinterest, and subscribing to my Youtube channel :)

If you’re looking for more content on Spain, check out my posts for Barcelona and Seville.

♥ Cindy

 
Food, 2Cindy ZhangComment
My Travel Essentials


Now that summer is here, we’re all thinking about traveling to new places and going on adventures. But travel can be pretty frustrating at times—from the hassle of carrying a bag full of outlet converters to your phone running out of battery constantly from high usage at the airport. In this post, I’ll share the essential items that I bring with me whenever I travel, along with all of the gear I use for photos and videos.


My Travel Essentials


Essentials for the need-to-document-everything type

Fujifilm QuickSnap Flash 400 Disposable 35mm Camera - I like to bring a film camera on trips in addition to my digital camera because it’s always a great surprise to see the photos after they’re developed, along with all the captured memories I’ve accumulated in the last few months or weeks. We’re all so used to digital photography and the instant gratification of snapping countless photos mindlessly and getting to see what they look like immediately. With only 27 photos in one camera, and not being able to see what photos look like until weeks later makes you much more conscious of how you’re composing the photo, and what you decide to take a photo of in the first place. Plus, after your film gets developed, your photos will all have a cool vintage film look to them. (See how my film photos of Italy turned out)

Camera charger and spare camera batteries - Never, ever, ever forget this if you’re planning on bringing your DSLR with you. When you’re snapping photos all day, your camera is bound to run out of battery pretty quickly, and it’s quite a hassle to find a camera store and try to get a new battery pack in a new city. (You can usually find camera stores in airports, but their products are usually overpriced)

Canon EF 50mm f/1.8 STM Lens - (For photos of food, of course!! and people) When you’re traveling, a standard lens that has a wide range of focal lengths is an essential. But, if you’re extra like me and like to take closeups of food or people, you should also invest in a zoom lens with a small aperture. I found the Canon 50mm f/1.8 to be super affordable and fantastic for dramatic photos with lots of bokeh.

Spare Micro SD cards - If you’re like me and find yourself taking photos of everything you find beautiful or interesting, then you’re likely to run out of space pretty fast. Bring a couple of spare Micro SD cards with you and remember to carry them with you before you go out exploring the town. Store a couple in your camera bag or in your wallet to keep them (and your memories) safe.


My Travel Essentials


DJI osmo Mobile 2 - If you love making videos of your travels and want to capture smooth, buttery footage as you walk around, a gimbal like the osmo Mobile 2 is a great affordable stabilizer. Pair it with a smartphone that has a nice camera to create cinematic content that people won’t believe was shot on a phone.

iPhoneX - “The best camera you have is the one you always carry with you,” right? For a reference on how to edit photos quickly straight on your phone, check out this post (for basic color correction) and this post (for removing unwanted objects in photos).

Canon EOS T7i - (Not pictured, because I was using it to take the above photo) The T7i is a lightweight DSLR that can do a whole lot—from great videos and audio quality to Canon connect: so you can instantly transfer photos to your phone to share with the world.


My Travel Essentials


Solving the outlet problem forever

HAOZI All-in-one Universal Travel Adapter with 2.4A 4USB - Yes, the world sucks for having so many different types of outlets, and before this gadget, I was wasting money on all sorts of converters and lost track of them after a trip ended. This all-in-one adapter for UK, EU, AU, Asia (covering 150+ countries) is not only great as an outlet adapter, but also just for charging all of your electronics since it has 4 built-in USB inputs. I found myself freeing up a lot of my luggage space by carrying this and not a bag full of outlet converts, plugs, and usb wires.


My Travel Essentials


If you’re out and about using your phone for directions or at the airport using it to kill time, you’re bound to use up your battery pretty quickly. When I travel, I carry around this huge Anker PowerCore 20100mAh power bank that is said to be able to charge an iPhone 7 almost seven times. It also has two USB ports in case a friend also needs to charge his or her phone, or if you need to charge other electronics as well.


My Travel Essentials


Because my eyesight is super bad, I always remember to bring my contacts as well as a pair of glasses to give my eyes some rest on long plane rides or when I’m relaxing at the hotel. A pair of classic Clubmaster sunglasses is also essential for the summer months, and will go with any outfit.


My Travel Essentials


Skincare

I tend to break out quite often on trips, and so I try to keep my skin clear by cleansing it thoroughly every night and keeping it moisturized. Because it’s tiresome to keep up with a full 5-7 step skincare regimen while traveling, I condensed it down to 2-3 steps: cleanser + sunscreen in the morning, and makeup remover + cleanser + moisturizer at night—with the occasional sheet mask here and there to do all the work for me while I’m relaxing after a long day.

Because it’s tough to carry around large skincare items (they’re heavy, plus they cause trouble at airport security), I like to carry sample size items that I received using my Sephora points or giveaway samples.

Sunscreen is also super important if you’re walking around outdoors all day. One that really works for me is Glossier’s Invisible Shield sunscreen, which is super lightweight and has a formula that you can barely feel. Because I get sunburnt pretty easily, I never rely on sunscreen alone and try to take a wide-brimmed hat along with me as well if I know I’m gonna be out and about.

Not really skincare, but—this foldable toothbrush is also super convenient for travel.


My Travel Essentials


Sorry for the lack of posts lately, but I hope you found this helpful! If you did, please don’t hesitate to save it to a board on Pinterest :)

Bon voyage! ✈️

♥ Cindy

 
A weekend in Seville, Spain (+vlog)

Shot on Canon T7i and edited with Adobe Premiere. Please subscribe to me if you enjoyed the video.


Known for being the birthplace of Flamenco, Seville is a unique city that blends Spanish culture with its Moorish past. Filled with colorful houses, narrow streets, and delicious tapas, it’s the perfect place to explore on a warm summer weekend.


A weekend in Seville, Spain


People have told me that different regions of Spain are like different countries—and it really showed when I flew into Seville from Barcelona. The large city blocks of Barcelona became small narrow streets—inhabited by cars, bikes, and pedestrians all at the same time. The large apartment buildings turned into small colorful townhouses, influenced largely by Moorish architecture in their design.

Seville is much smaller compared to Barcelona, and you can visit most of its attractions by walking. Here’s a map of my favorite spots.


A weekend in Seville, Spain


The Santa Cruz Neighborhood

I stayed in the Santa Cruz district (formerly known as the Jewish Quarter). This neighborhood is walking distance from a variety of attractions—including the Alcázar, Cathedral of Seville, and Plaza de España. Food options are limitless here, as it is home to countless tapas bars, formal sit-down restaurants, and cafés. To put the cherry on top of it all, this neighborhood is also filled with gorgeous narrow streets surrounded by colorful homes inspired by both Spanish and Moorish design.


Where I stayed

Sevilla Luxury Rentals - Alcázar 

Calle Miguel Mañara, 14
Seville

Pros: The location. It’s situated right next to the Alcázar and the Seville Cathedral. Its location in the Santa Cruz neighborhood makes finding food extremely easy. There are also several convenience stores located just outside the hotel. The check-in process was easy, and the staff even offered to provide a taxi service to and from the airport.

Cons: Because of how close it is to the Alcázar, the price ended up being pretty high. It also felt pretty touristy and didn’t feel as authentic as staying in someone’s Airbnb.


A weekend in Seville, Spain


The Real Alcázar of Seville

Explore the Alcázar of Seville, which was a Christian royal palace built on a Muslim residential fortress. Its unique architecture is influenced by its rich history of Christian and Moorish rule. Be sure to visit the Hall of Ambassadors, which contains one of the most gorgeous ceilings. If you’re a Game of Thrones fan, you might also recognize the Alcázar’s Patio de las Doncellas courtyard, which was used as the filming location of the Kingdom of Dorne.


A weekend in Seville, Spain


There’s lots to explore in this huge palace: including lush outdoor gardens adorned with palm trees and the Baths of Maria De Padilla, which is an underground pool that’s guaranteed to be kept cool in the sweltering summers.

Be sure to book your tickets ahead of time for a given time slot, as the line for the tickets can get extremely long. 


A weekend in Seville, Spain


Plaza de España

Otherwise known as the “Spanish Square”, Plaza de España is one of the most beautiful open areas to stroll through in Seville. The pavilion buildings are decorated with mosaics, and encloses a small stream where you can take a relaxing boat ride. 


A weekend in Seville, Spain


If you’re looking for free attractions in Seville, this plaza is great for viewing open Flamenco performances and musicians alike.


A weekend in Seville, Spain


El Pinton for Lunch

If you’re looking to eat tapas in a sit-down, upscale ambiance, try El Pinton. Their spacious dining room is illuminated by a huge window in the ceiling that lets in a lot of natural light. Even though the dishes and the setting might seem pretty fancy, the price point is really not too bad (especially compared to San Francisco prices). You can get a main for around 9.5 euros at lunchtime. The restaurant was fairly empty when I went at noon, but I’ve heard that it gets super busy around dinner time—so try making a reservation ahead of time.


A weekend in Seville, Spain


I made the effort of waking up early to take street photos again :) Unfortunately, Seville’s sunrise happens fairly late (around 7:50-8:00), so the streets were still fairly dark when I went out.


c
A weekend in Seville, Spain


las setas

Also known as Metropol Parasol (the Mushrooms of the Incarnation), Las Setas gets the crown for being the largest wooden structure in the world. Its modern design stands out against the city’s traditional Spanish and Moorish houses, and acts as a great viewpoint for the rest of the city. There’s even an underground farmers market where you can find fresh produce and small cafés.


It can get pretty confusing trying to figure out how to get up to the top of the structure. All you have to do is go down to the bottom-most level to purchase tickets (3 euros) to take an elevator up to the top.


A weekend in Seville, Spain
IMG_2789.jpg
A weekend in Seville, Spain


See a Flamenco show

Seville is the birthplace of Flamenco, so definitely try to catch a show while you’re here. I bought tickets to see an amazing show at the famous La Casa del Flamenco, but you can also catch a lot of flamenco action out on the streets in Santa Cruz and in the Plaza de España. It’s amazing to see all the dancers so in sync with the guitarist and singer.


A weekend in Seville, Spain


Breakfast and coffee at salt and sugar

Seville can get pretty touristy, which means I got tricked into having breakfast one morning at a coffee shop that served frozen pizzas (say what..?!). I found Salt and Sugar the next morning after an early photo walk and was drawn in by the dainty interior. I had a toasty croissant stuffed with a slice of a Spanish omelette (Tortilla Española) and a vanilla café con leche—which was so deliciously creamy and sweet (but probably super high in calories… but who cares when you’re on vacation, right?)


A weekend in Seville, Spain


Seville Cathedral

If you’re looking for something to do after visiting the Alcázar, the Seville Cathedral is located right next door. If you’re not too tired at this point, you can climb the La Giralda tower to get a great view of the city. Fun fact: Christopher Columbus is actually buried underneath the cathedral!


Eat Moroccan food

If you’re looking for a break from tapas, Seville is a great place for Moroccan food (considering it was previously ruled by the Moors). I went to Fez for lamb tagine (hearty moroccan stew eaten with cous cous) and Al Wadi for kebabs and seriously some of the best hummus I’ve ever had. Moroccan restaurants are also super accommodating for delicious vegetarian options.


A weekend in Seville, Spain


Now… if you don’t mind, I’m going to dump more photos of the gorgeous Santa Cruz neighborhood here :)


A weekend in Seville, Spain


Photos were taken on the Canon T7i and edited in Adobe Lightroom CC, with the exception of a few taken on my iPhone and edited with VSCO.

With its middle-eastern influences, Seville was definitely one of the most unique cities in Europe I’ve visited. It’s also one of the most colorful cities I’ve seen (up there with Burano!). Seville’s small size also makes it really convenient to see all the attractions in a day or two—perfect for a weekend getaway!

♥ Cindy

 
Travel, 2Cindy ZhangComment
72 Hours in Barcelona (Itinerary + Vlog)
 

Barcelona is a city full of beautiful street corners, unique architecture, and incredible food. It’s perfect for exploring on foot, and a heaven for photographers and foodies.


72 Hours in Barcelona


With all it has to offer, Barcelona might seem a bit overwhelming to tackle in under 72 hours. But no worries—I documented my itinerary for sightseeing and places to eat from Sunday night until Wednesday morning, putting locations that are closer together in one day so you can visit them in the most efficient way possible. If you’re curious, you can also check out the map to see all of these locations in context.


72 Hours in Barcelona
72+Hours+in+Barcelona


SUNDAY, 5:00PM: CHECK INTO APARTMENT

Instead of choosing a standard hotel room or an Airbnb, I decided to try something new this time and stay at an apartment that’s been converted to a hotel room. My favorite part of the apartment was the little nook in the back that led into the building’s courtyard from a set of stairs. Very European.

Where I stayed:

Eat Sleep Gaudi Terrace

Calle Valencia, 347
Barcelona
Eixample neighborhood

Pros: The size and location of the apartment were both perfect. It’s located in the busy Eixample neighborhood and only a 10 minute walk away from La Sagrada Família and Casa Milà. The building is also surrounded by numerous tapas bars and small food markets and pharmacies.

Cons: The walls are thin and it gets pretty noisy at night (it is located in a busy neighborhood, after all, and Spaniards eat dinner late so they probably stay out pretty late too). My check-in process was also not great, given that I arrived on a Sunday and the office was closed. It took me a while to find the instructions they left on how to get inside the apartment.


72 Hours in Barcelona


6:00PM: ARC DE TRIOMF

The hotel room wasn’t very far from the Arc de Triomf (it’s of the same name as the one in Paris, but it’s much smaller). There’s a beautiful pedestrian-only path surrounded by palm trees that leads you to Ciutadella Park.


72 Hours in Barcelona


8:00 PM: TAPAS AT CIUDAD CONDAL

Ciudad Condal was my first meal in Barcelona, and my first tapas experience in Spain. As one of the more popular tapas bars in Barcelona, expect a wait. Come with a group of friends so you can try more items on their huge menu. I was impressed by how fresh the ingredients in every dish were, and how cheap everything was—considering a lot of the items we ordered were seafood-based.

As my first meal in Barcelona, I wanted to get all the essential tapas: fried padron peppers, croquettes, and pan con tomate, which is a simple but delicious toast covered in a light tomato sauce and olive oil (and garlic, maybe…?). Can’t choose a favorite dish if I tried, but I totally fell in love with how fresh the seafood was.


72 Hours in Barcelona


Monday, 8:00 AM: SUNRISE AT PARC GÜELL

Come to Parc Güell (pronounced park goo-way) when it first opens at 8AM to get a panoramic view of Barcelona. Since the park faces east, it’s the perfect place to catch a sunrise over the city. Designed by the architect Antoni Gaudí—who created many of his works in Barcelona—the park was originally built to be a housing development. Filled with lush gardens and colorful mosaics, it opened as a public park in 1926 and is now a UNESCO World Heritage Site. It’s just contained enough where you don’t have to do a huge amount of walking, but complex enough where you can spend lots of time ogling at the intricacies of the unique structures around the park.


72 Hours in Barcelona


One warning before you go: as of April 2019, parts of the park are under construction, but it doesn’t really affect much of the park. Also, be sure to get tickets to enter the Monumental Core (though they’re pretty lax with checking tickets early in the morning).


72 Hours in Barcelona


11:00 AM: Hiking at Bunkers Del Carmel

Just northeast of Parc Güell is Bunkers Del Carmel, a great vantage point to get a comprehensive view of Barcelona. You can see La Sagrada Família from here, as well as the Montjuïc mountains. It wasn’t a very tough hike up to the top, but the path was filled with some very interesting bugs! In fact, some really skinny and long black bugs that looked like worms. Very terrifying, but also very fun to look at.

I also really enjoyed walking through the Horta-Guinardó neighborhood, which appeared far more residential than the rest of the bustling city. I saw lots of parents dropping their kids off to school, as well as many dogs out on their walks. This area is filled with smaller, discrete homes compared to the large apartment buildings in Eixample.


72 Hours in Barcelona


2:00 PM: BOURDAIN-APPROVED TAPAS AT QUIMET & QUIMET

Okay, I know the idea of cold canned fish doesn’t sound very appealing, but that’s because you’ve probably only ever come across it in the tuna sandwich context. Canned fish is actually a gourmet specialty in Spain and Portugal. Does it make it better when I tell you that caviar comes in a can?

At Quimet y Quiment, you can get some really tasty seafood on top of crispy toast and pickled vegetables, all topped off with a delicious drizzle of olive oil. Some items will even be topped with caviar, and the average price for a tapa was about 3 euros. The wine and beer are super cheap too, and is probably way more worthwhile than drinking water. This is a step higher than Ciudad Condal, which served pretty standard tapas that you could probably get at a hip Spanish restaurant in San Francisco. Quimet y Quimet is, in my opinion, a little more ambitious and not for those who are squeamish about anchovies and pork cheeks and foie gras, etc.

You can easily see why Anthony Bourdain loved this place. It’s a hole in the wall with standing-room only. There is wine on the walls piled all the way to the ceiling. Locals and tourists alike fill up the space. The servers are also super friendly, and are very open to suggesting items off the menu.


72 Hours in Barcelona
72+Hours+in+Barcelona
72 Hours in Barcelona


5:00PM: La Sagrada Família

Now, for probably my favorite part of my entire trip of Spain: walking inside La Sagrada Família. I’m upset that I didn’t spend more time inside it. I’ve been to a lot of cathedrals across Europe, and although they were beautiful in their own ways, none of them are as unique as this one. There are intriguing details in every direction you look, large and small. Try to plan your visit in the afternoon, where there will be red light pouring in from the stained glass windows. I’ve heard in the morning, the cathedral will have more of a blueish tint. I found it really difficult to capture its grandeur in photos. I didn’t have a wide angle lens with me, but a 10mm or a fisheye would’ve worked wonders.

Definitely book your tickets ahead for a scheduled time. This is a hugely popular tourist destination so expect a long line for tickets.


72 Hours in Barcelona


Listen to the podcast before you go!

One of my favorite podcasts, 99 Percent Invisible, has an incredible episode on La Sagrada Família. Learning about the cathedral’s story gave me the chills (especially learning that it was partially destroyed in the Spanish Civil War—spoiler alert!). Definitely give it a listen before you go to for some context. There’s also a snippet at the end about how computers and parametric design software is now being used to design the cathedral.


72 Hours in Barcelona


Tuesday, 8:30AM: Baluard Barceloneta for breakfast

Baluard Barceloneta is a bakery that was recommended to me by Airbnb Experiences that’s just minutes away from Casa Milà. They have a huge selection of pastries, tarts, and filled-donuts that will leave you feeling way too indecisive for so early in the morning. So come with a large group of friends so you can try all of them :)


72 Hours in Barcelona
 
72 Hours in Barcelona
 
72 Hours in Barcelona
 
72 Hours in Barcelona
 
72 Hours in Barcelona


9:00AM: Casa Milà

Casa Milà is another one of Gaudi’s works that was initially designed to be a private residence. It’s other name “La Pedrera,” or “stone quarry,” is actually a nickname given by the citizens of Barcelona who disapproved of its rough outer appearance. Although it’s now a UNESCO World Heritage site and visited by people all over the world, it once appeared in many satirical pieces as was a subject of humor for many of Barcelona’s residents.


72 Hours in Barcelona


11:00 AM: Casa Batlló

If this is still in construction by the time you visit, consider skipping it.

I was tempted to come visit Casa Batlló after looking at photos on Pinterest of its gorgeous exterior and the building’s lack of straight lines. Unfortunately, while I was in Barcelona (April 2019), the building was going through a large renovation which left the facade completely covered up and many areas of the building inaccessible. Although I had booked tickets ahead of time, I still had to wait around 45 minutes to enter. It was definitely not worth the ticket price and the wait, and I have to say that I enjoyed Casa Milà way more.


72 Hours in Barcelona


12:30 PM: Lunch at La Boqueria

La Boquería is a huge farmers market right next to La Rambla that sells yummy ready-to-eat street foods like empanadas and croquettes as well as a huge selection of produce, fresh seafood, and meats. It’s basically a food heaven. Jamón ibérico and serrano (thinly-sliced cured pork, kind of like prosciutto) are on display everywhere in this market, so definitely try a few pieces as it’s hard to get your hands on jamón outside of Spain. Try out the freshly squeezed or blended fruit juices too—you’ll even find some tropical juices made from guava and coconut, all selling for really low prices (if I recall correctly, I got a cup for 50 cents).

Because the La Rambla area and La Boquería can get very crowded, try to keep an eye on your bags at all times. Barcelona is the pick-pocket capital of the world, and you might become the next victim as you’re strolling through these busy areas.


72 Hours in Barcelona


1:30 PM: explore the Gothic Quarter

Just a few blocks away from La Boquería is the Gothic Quarter, a neighborhood filled with tiny streets, medieval architecture, and countless tapas bars and shops. Set aside some time here to visit the Barcelona Cathedral and the Picasso Museum, or just to get lost inside the beautiful narrow streets. You’ll instantly feel like you’ve escaped the busy city after slipping away into a beautiful secluded alleyway.


72 Hours in Barcelona


3:00PM: Tour the Palace of Catalan Music

Located just on the edge of the Gothic Quarter, The Palace of Catalan Music is a beautiful concert hall open for shows at night and tours during the day. I would’ve loved to see a concert here, but didn’t get a chance to plan it into my itinerary. So instead I hopped onto an afternoon tour instead where I learned about the history of the concert hall. The hall sits around 2000 people, and is actually one of the few concert halls in the world that is illuminated by natural lighting.

I also learned that famous composers like Rachmaninov, Ravel, and Stravinsky performed their original works here. Jazz/Bossa Nova musicians like Ella Fitzgerald, Duke Ellington, and Gil Gilberto have also graced the stage. Yeah, no big deal.


72 Hours in Barcelona


4:30PM: Churros & chocolate at Xurreria Laietana

Xurreria Laietana (or Churrería Laietana) is one of the more popular churros spots in Barcelona and is another one of those hole-in-the-wall places that has a line spilling into the street. Here you can get freshly fried churros at a low price as well as a cup of chocolate sauce to dip them into (note that this is a thick chocolate sauce, and not to be mistaken for hot chocolate, even though it comes in a coffee cup). Try to visit when they first open in the morning, or when they reopen in the afternoon (around 4:30 PM) to avoid lines and to find a place to sit.


72 Hours in Barcelona


9:00PM: The best paella of my life at Arume

Okay okay, I know Paella is not from Barcelona and that Valencia is the best place to get it. And it’s probably true that there’s a myriad of tourist traps that will serve you “paella” on every street corner. So after doing extensive research on Yelp and TripAdvisor I decided on Arume, a small, romantic, sit-down place specializing in Galician cuisine. We got a Tortilla Española (Spanish omelette) to start, and then 2 different paellas to share: the seafood paella, and the duck paella.

The duck paella! Oh my goodness. It was probably one of my favorite dishes in Spain. The paella was very rich and flavorful, filled with large chunks of duck, different kinds of mushrooms, and topped with fried peppers and mayonnaise. I’m a big fan of poultry and mushrooms, and the kick from the pepper balanced out the richness of the duck. This dish basically contained all of my favorite ingredients in one hot plate, and I wish I could’ve gone back there a second time to eat it.

Also I want to say that the dining experience here was nothing short of perfect. You can easily make a reservation on their website and not have to wait for a table (we saw a group waiting for a table when we walked in, and still waiting when we left, so I highly recommend booking a reservation). The service is also great, with very friendly waiters and hosts, ready to explain the menu and give you recommendations.


72+Hours+in+Barcelona
72 Hours in Barcelona


Wednesday, 7:30 AM: Early morning photowalk

I wanted to see La Sagrada Familía without all the tourists before I left, so I woke up early in the morning to watch the sun rise behind it. I really loved the lighting at this hour, and how it gave the cathedral’s facade a reddish tint.


72 Hours in Barcelona


9:00 AM: Chocolate Croissants at Forn De Sant Jaume

Forn De Sant Jaume is a cute little bakery and breakfast spot filled with locals. After watching Simon & Martina’s YouTube video on what to eat in Barcelona, I knew I had to come here for their chocolate croissants and bunyols. I loved how creamy and thick the chocolate on the inside of the croissant was. The consistency was so much richer than that of a chocolate croissant you would get here in the states. It was a super simple but decadent last meal in Barcelona.


Photos were taken on the Canon T7i and edited in Adobe Lightroom CC, with the exception of a few taken on my iPhone and edited with VSCO.

Though Barcelona is a safe city for the most part, it does have a pick-pocketing problem. When you visit, be sure to keep an eye on your bags at all times, as pick-pockets might appear in the most unexpected places. Don’t let it ruin your trip, but do keep it in the back of your mind at all times.

Hope you found this (rather lengthy) guide to Barcelona helpful. Have fun in Barcelona, and ¡buen viaje!

♥ Cindy

 
Travel, 2Cindy ZhangComment
Gyoza 2 ways: pork & cabbage, chicken & mushrooms


Watch the video for a in-depth tutorial on how to make this dish. If you enjoyed watching, please give me a thumbs up/subscribe to me on YouTube!


How to make Gyoza | potstickers | dumplings | 餃子

 
Gyoza 2 ways: pork & cabbage, chicken & mushrooms


Today we’re making one of my all-time favorite things to eat: potsticker dumplings, otherwise known as gyoza. We’ll be making them with 2 different fillings: pork and napa cabbage (from my mom’s recipe) as well as chicken and dried shiitake mushrooms.


Gyoza 2 ways: pork & cabbage, chicken & shiitake
Gyoza 2 ways: pork & cabbage, chicken & mushrooms


Gyoza might seem pretty intimidating, but they’re actually really easy to make on weekends for meal prep on weekdays. If you don’t want to cook all of your dumplings right away, you can freeze them and eat them throughout the week. Just make sure you arrange them in a flat layer when you’re freezing them so that they don’t stick together.


Gyoza 2 ways: pork & cabbage, chicken & shiitake


You can’t go wrong with the classic pork and napa cabbage filling. I’ll show you my mom’s recipe, which I grew up eating. You’ll need: ground pork, napa (or Chinese) cabbage, scallions, eggs, minced ginger & garlic, vegetable or canola oil, cornstarch, white or black pepper, soy sauce, and salt.

We want to make sure the cabbage doesn’t release too much water into our dumplings. To make the cabbage give up its moisture, sprinkle some salt onto the cabbage and set it aside for 30 minutes. Note that different types of cabbage and different parts of the cabbage itself may release more water than others.


Gyoza 2 ways: pork & cabbage, chicken & mushrooms


Chicken and dried shiitake mushrooms are a classic pairing in Chinese cuisine. For this filling, you’ll need: ground chicken, dried shiitake mushrooms (soaked overnight), water from soaking the mushrooms, carrots, scallions, eggs, minced ginger & garlic, cornstarch, soy sauce, sesame oil, and salt.

Most of the time, store-bought ground chicken is made from chicken breast—which I’m not a big fan of. So, if you’re really finicky about this stuff like me, you can make your own ground chicken by mincing some boneless chicken thigh (which will make a much more tender filling).


Gyoza 2 ways: pork & cabbage, chicken & mushrooms


Rumor has it that you should only mix the filling in one direction to keep the meat tender and juicy. I’m not sure if this is scientifically proven or if it’s just an old Chinese myth, but my mom swears by it. Happy mom = happy life, and happy wife = happy life, so my dad and I just do it for kicks.

One of the hardest things about making dumplings is how finely you have to chop the vegetables. You can easily make a mess in the kitchen (and even hurt your fingers) by chopping all of these vegetables into tiny pieces. Instead, I recommend using a food processor to chop your veggies, if you have one, to make your job 10 times easier.


How to fold dumplings

 
Gyoza 2 ways: pork & cabbage, chicken & mushrooms


1) Put some filling into the center of the wrapper and add some water to the edges. The water will help the sides stick together.

2) Fold it half way and pinch it in the center. Add more water on the edges of the outside layer, specifically on the side where you intend to create the folds.


Gyoza 2 ways: pork & cabbage, chicken & mushrooms

3) Fold in the open flaps, kind of like you’re sealing an envelope. Start with fold that’s closest to the middle, and fold the wrapper in until it aligns with the top of the wrapper.

Gyoza 2 ways: pork & cabbage, chicken & mushrooms

4) Create a second fold with the flap, also aligning it with the top of the wrapper.

Gyoza 2 ways: pork & cabbage, chicken & mushrooms

5) Create two more folds on the other side, symmetrical to the ones you already made.

6) Pinch the top edges to ensure that it’s completely sealed. We wanna make sure the edges really stick together so that the dumpling doesn’t open up when we boil it or fry it.


16 oz of meat will usually make around 40 to 50 dumplings, depending on how much filling you put into each one. If you’re not too confident in your wrapping skills, you can start off by using a smaller amount of filling in your dumplings. It’ll be a lot easier, trust me!


Gyoza 2 ways: pork & cabbage, chicken & mushrooms
 

Voilà! You’re done!

My mom literally makes 5 of these while I make 1.

 
Gyoza 2 ways: pork & cabbage, chicken & mushrooms


Secret to giving your gyoza wings: Nope, not red bull. Cornstarch and water, actually! Most people will just pour water into the pan to steam them, but I like to stir in a little bit of cornstarch or potato starch (or even flour) into my water before I add it to the pan. Another trick to making them super presentable is to arrange the gyoza in a windmill shape in an 8-inch nonstick pan, put a plate over them once they’re done, and flip the pan onto the plate.


Gyoza 2 ways: pork & cabbage, chicken & mushrooms


Not so much into frying these babies? You can make a healthy(ish) version by steaming them or boiling them! Just be sure not to boil them for too long until they’re soggy (you can avoid this by boiling them without the lid for the last few minutes), but also boil them long enough to ensure the meat is cooked. The hardest part is deciding which one tastes better: the pan fried ones, or the boiled ones?

Answer: porque no los dos?


Gyoza 2 ways: pork & cabbage, chicken & mushrooms


Gyoza 2 Ways: Pork & Cabbage, Chicken & Mushroom

Ingredients for Pork & Cabbage gyoza

  • 40-50 store-bought gyoza wrappers
  • 16 oz ground pork
  • 2 eggs
  • ½ cup chopped scallions
  • ½ stalk of Napa (or Chinese) cabbage, around 2 cups after they've been chopped and dehydrated*
  • 1 tsp minced ginger
  • 1 tsp minced garlic
  • 2 tsp soy sauce
  • 1 tbsp oil
  • 2 tsp cornstarch or potato starch
  • 2 tsp salt
  • sprinkle of white or black pepper

* You'll need to dehydrate the cabbage so the dumpling filling isn't watery and soggy


Ingredients for Chicken & Mushroom gyoza

  • 40-50 store-bought gyoza wrappers
  • 16 oz ground chicken
  • 2 eggs
  • ½ cup chopped scallions
  • 1 cup diced carrots
  • 1 cup diced dried shiitake mushrooms that have been soaking in water
  • 1 tsp minced ginger
  • 1 tsp minced garlic
  • 2 tsp soy sauce
  • 2 tsp sesame oil
  • 2 tsp cornstarch or potato starch
  • 2 tsp salt
  • 2 tbsp soy sauce
  • 1 tbsp water that shiitake mushrooms have been soaking in (optional)

Ingredients for the slurry

  • 3 tbsp water
  • 2 tsp cornstarch/potato starch/flour

Takes , Makes 8 servings for each filling, which each person eating around 5 dumplings.


Instructions for the Pork & Napa Cabbage Filling

  1. Finely chop the Napa cabbage. If you have a food processor, use it to do all the chopping for you to avoid the mess :)

  2. We want to make sure the cabbage doesn’t release too much water into our dumplings. Sprinkle some salt onto the cabbage to help it lose some of its moisture and set aside for 30 minutes.

  3. After setting it aside, squeeze out all the water from the cabbage and put it into a strainer. Note that different types of cabbage and different parts of the cabbage itself may release more water than others. After squeezing out all the water, you should be left with about 2 cups of cabbage to balance out 16 oz of ground pork.

  4. Combine the ground pork, cornstarch, soy sauce, eggs, ginger, garlic, white pepper, salt, and cabbage in a large heat-proof bowl. Stir the mixture in one direction to keep the meat tender and juicy. Add the scallions on top of the mixture but don't stir it in yet.

  5. Heat up a tablespoon of oil in a small pan until it reaches its smoking point. Pour the hot oil onto the scallions and your mixture. The hot oil will make the scallions release their natural oils and flavor. Be careful not to burn yourself while pouring in the hot oil. Stir the oil into the mixture, going in one direction.

Instructions for the Chicken & Mushroom Filling

  1. Soak 6 dried shiitake mushrooms in some water and leave them in the fridge overnight or until they're soft. You’ll tell when they’re fully soaked through by checking if the stems are soft enough to cut through. Dry them off on a paper towel and chop them into small pieces.

  2. Combine the ground chicken, cornstarch, soy sauce, sesame oil, eggs, ginger, garlic, salt, shiitake mushrooms, and diced carrots in a large bowl. Stir the mixture in one direction to keep the meat tender and juicy.

Instructions for Pan-frying

  1. Heat some canola or vegetable oil in an 8 to 10 inch frying pan and swirl it around to make sure the bottom is completely covered. Arrange the dumplings in a nice shape, so that it looks pretty when we flip it out of the pan. Fry them for about 30 seconds without water to let the bottom brown up a bit.

  2. Mix 2 tsp of cornstarch with 3 tbsp of water and add it to the pan. The water should cover up about 60-70% of the dumpling. Put a lid on the pan and steam the dumpling for about 5-6 minutes, or until most of the water has evaporated.

  3. After that, cook the dumplings without the lid for 1-2 minutes for a nice brown crust to develop. Keep a close eye on them to make sure the bottoms don’t burn.

  4. When you see the brown edges forming, put a plate over pan and flip it over. This will make sure the potstickers stay together and create a really beautiful presentation

Instructions for boiled dumplings

  1. Bring water to a boil in a wok and add in 10-15 dumplings, stirring them constantly to make sure they don't stick together. Immediately put a lid over them.

  2. When the water comes to a rolling boil, add in about 1 cup of water and put a lid on the pan. Continue stirring them with a ladle if they're sticking together.

  3. Let the water come to a rolling boil again, and add a second cup of water. Cook them for a few minutes without the lid. They should be finished cooking when they float to the surface.


IMG_1315.jpg


This is a super fun food to make with friends! Why not try hosting a dumpling-making party? If you tried these, let me know how it turns out for you by tagging @cinders_zhang on Instagram! Support me by saving this recipe on Pinterest, and subscribing to my Youtube channel :) Good luck in the kitchen!

♥ Cindy

 
Food, 2Cindy ZhangComment